Crafting a Dream Patio with Pavers
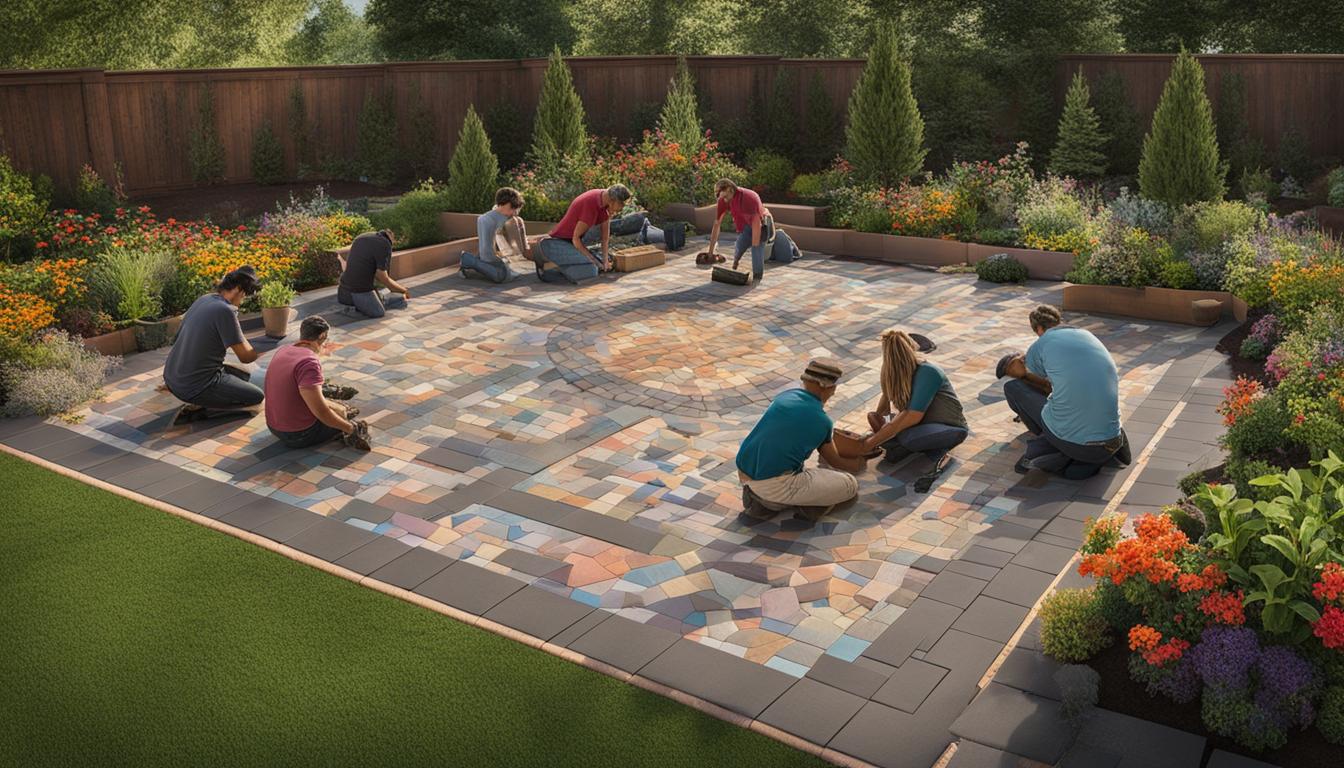
Welcome to the world of DIY patios! If you’re looking for a way to transform your outdoor space and create a beautiful sanctuary that adds value to your home, then you’re in the right place. With the help of this step-by-step guide, you’ll learn how to make a patio with pavers that will impress your guests and provide the perfect spot to relax and enjoy the great outdoors.
Key Takeaways
- Creating a patio with pavers is a great way to add value to your home and enhance your outdoor living space.
- Proper planning, preparation, and installation are key to ensuring a long-lasting and stable patio.
- The process involves selecting the right pavers, preparing the ground, installing edge restraints, laying the paver base, placing the pavers, and adding finishing touches.
- By following the step-by-step instructions provided in this guide, you’ll be well on your way to creating a custom-made patio that meets your specific needs and enhances the beauty of your outdoor space.
Planning Your Paver Patio
Creating a beautiful paver patio requires planning and visualization. By taking the time to carefully plan your patio, you can ensure that it meets your needs and fits seamlessly into your outdoor space. Here are some paver patio ideas to help guide you through the planning process:
Selecting Your Pavers
The first step in planning your paver patio is selecting the right pavers to suit your needs. There are a variety of paver options to choose from, including concrete, brick, and natural stone. Each material has its own unique characteristics and offers a different aesthetic value, so it’s important to consider your personal preferences, budget, and style of your home when making your selection.
| Material | Pros | Cons |
|---|---|---|
| Concrete | Durable, versatile, low-maintenance, and affordable. | Less visually appealing, prone to cracking, and limited design options. |
| Brick | Classic, durable, slip-resistant, and available in a range of colors and patterns. | More expensive than concrete, requires regular maintenance, and less design flexibility. |
| Natural Stone | Unique and visually stunning, durable, and long-lasting. | Expensive, requires specialized installation, and may be prone to staining or fading. |
Consider the size and shape of your patio when selecting your pavers. Larger pavers can create a more modern look, while smaller pavers may suit a more traditional or intricate design. It’s also important to choose pavers that are slip-resistant, especially if your patio will be located near a pool or other sources of water.
Determining the Size and Shape of Your Patio
Before getting started, determine the size and shape of your patio. Consider how you plan to use your outdoor space and any features you may want to incorporate, such as a fire pit, seating area, or outdoor kitchen. Once you have a general idea of your patio’s layout, use spray paint or stakes and string to mark off the area. This will help you to visualize the size and shape of your patio and make adjustments as needed.
Incorporating Additional Features or Elements
Depending on your preferences, you may want to consider incorporating additional features or elements into your paver patio design. For example, you could add lighting, water features, or even a garden bed. These elements can add visual interest and functionality to your outdoor space, making it a true extension of your home.
By following these paver patio ideas for planning your outdoor space, you can create a beautiful and functional patio that you’ll enjoy for years to come.
Preparing the Ground

Before starting your paver patio project, it’s important to assess the site and prepare the ground properly to ensure a solid foundation for your patio. Follow these steps:
Determine the Site
The first step is to determine the location and size of your patio by marking the space with spray paint or stakes and string. Measure the area to decide how much material you will need to fill it and determine the type of pavers that will work best in the location.
Clear Vegetation
Next, clear the vegetation and grass from the site and remove any debris or rocks that may be in the way. Use a shovel or a sod cutter to remove the grass, making sure to dig deep enough to remove the roots.
Excavate the Area
Now, it’s time to excavate the area to a depth of at least 6 inches. This will provide enough space for the base material, sand, and pavers. Use a shovel or a mini excavator to dig out the soil and create a level surface for the base.
Add Base Material
After excavating the area, it’s time to add the base material. This will provide stability and help with drainage. Apply a layer of crushed gravel or stone to the excavated area, making sure it’s level and compacted using a plate compactor or hand tamper.
Note: The depth of the base material depends on the type of soil and the intended use of the patio. It’s recommended to consult with a professional or follow the manufacturer’s guidelines for specific instructions.
Installing the Edge Restraints
Edge restraints serve as a critical component of your paver patio, keeping the pavers in place and maintaining the overall structure of your design. There are different types of edge restraints available, including plastic, aluminum, or concrete. Selecting the right edge restraints depends on the size and shape of your patio and the design you envision.
Before beginning the installation of the edge restraints, it’s essential to prepare the ground adequately and ensure that it’s level. Once you’ve prepared the base and compacted it, you can begin placing the edge restraints around the perimeter of your patio. Make sure you follow the manufacturer’s instructions regarding spacing and placement, as each restraint differs in its installation requirements.
Next, secure the edge restraints to the ground by driving stakes through the holes provided in the restraint. Use a rubber mallet to avoid damaging the restraint or stake. Ensure that the top of the edge restraint is flush with the surface of the pavers, as this will help maintain the integrity of your patio over time.
In situations where the edge of your patio meets an existing structure or feature, such as a wall or garden bed, you may need to make cuts and custom-fit the edge restraints. This requires precise measurements and cutting with a saw or chisel. To ensure a seamless transition between the pavers and the existing structure, you may need to add a flexible joint sealant or caulking.
Overall, installing the edge restraints is a crucial step in creating a stable and durable paver patio. Proper placement and installation ensure that your patio can withstand the elements and retain its beauty and function for years to come.
Laying the Paver Base
Before laying the pavers, you need to ensure a solid foundation by properly preparing the base. The base provides structural support, aids drainage, and prevents settling.
Materials needed:
- Crushed stone
- Sand
- Landscape fabric
- Tamper
- Shovel
- Level
Steps to Laying the Paver Base
Follow these steps to prepare and lay the paver base:
- Clear the area: Remove any grass, plants, or debris from the area where the patio will be laid.
- Excavate the area: Dig out the soil in the area to a depth of about 8 inches to make space for the base.
- Spread landscape fabric: Place landscape fabric over the excavated area. This will prevent weed growth and help with drainage.
- Lay the base materials: Fill the excavated area with a 4-inch layer of crushed stone. Use a tamper to compact the stone until it is level.
- Apply a layer of sand: Spread a 1-inch layer of sand over the compacted stone. Use a level to ensure an even distribution of the sand.
- Level the sand: Use a straight board or level to level the sand.
- Compact the sand: Use a tamper to compact the sand. The sand should be firm before laying the pavers.
The base is now ready for laying the pavers. Follow the steps in the next section to lay the pavers correctly.
Placing the Pavers
Now that you have prepared the ground and installed the edge restraints and base, it’s time to start laying the pavers. As you begin, it’s important to keep the following tips in mind:
- Start from one corner and work your way outwards. This will help ensure that the pavers are even and in place.
- Check for levelness constantly to avoid any uneven areas. Use a level to confirm the pavers are level in all directions.
- Use a rubber mallet to tap each paver into place. This will help to ensure that it is seated firmly in the base.
- Leave a gap of around 1/4 inch between each paver to allow for any necessary adjustments and for material to fill in between the pavers.
To create a visually appealing pattern, consider using various sizes and colors of pavers. You can also create a border or accent using a different color or pattern of pavers along the edges of your patio. A creative design can transform your patio into a work of art.
Caring for Your Pavers
Once all the pavers are laid in place, make sure you clean them of any debris or dirt. You can use a broom or leaf blower to remove surface debris. Also, use a pressure washer to clean the pavers of any stains or moss accumulation. Keep your pavers looking new by sealing them annually if necessary.
Remember, your new paver patio will become a favorite spot for outdoor gatherings and relaxation. Take care of your patio to extend its life and maintain its beauty.
Cutting and Fitting Pavers
When installing a paver patio, you may come across areas where you need to cut or fit the pavers to fit within the designated space or around any features or obstacles. While this may seem daunting, with the right tools and techniques, you can achieve a professional-looking finish.
Measuring and Marking Pavers
Before cutting any pavers, it’s important to measure and mark them accurately. Use a measuring tape to determine the width and length of the space where the paver needs to fit. Then, transfer these measurements onto the paver using a straight edge and a permanent marker.
Cutting Pavers
There are different tools you can use to cut pavers, including a chisel and hammer, a circular saw with a diamond blade, or a wet tile saw. The method you choose will depend on the size and shape of the paver, as well as the equipment you have available.
If you’re using a chisel and hammer, first score the paver along the marked line using the chisel. Then, place the chisel in the scored line and strike it with the hammer until the paver breaks along the scored line. Repeat this process until you’ve cut all the necessary pavers.
Alternatively, if you’re using a circular saw or a wet tile saw, make sure to wear appropriate safety gear and follow the manufacturer’s instructions for use. Use a straight edge or a guide to ensure a straight cut along the marked line.
Fitting Pavers
For areas where you need to fit pavers, such as around curves, corners, or other features, it’s important to make precise cuts to ensure a snug fit. Use the same measuring and marking techniques as above, then cut the pavers to fit the designated space.
If you’re having trouble getting a precise fit, consider using sandpaper or a grinder to make minor adjustments to the shape of the paver. Be sure to test the fit frequently as you work to ensure a proper fit.
Remember, cutting and fitting pavers takes time and patience, so don’t rush the process. With a little practice and careful attention to detail, you can achieve a beautiful and functional patio using pavers!
Finishing Touches and Maintenance
Now that your patio is complete, it’s time to add some final touches to enhance its aesthetics and functionality.
Paver Pathway
If you have a larger outdoor space, consider adding a paver pathway that leads to your patio. This not only adds to the overall design but also helps to define the walking areas and prevent damage to your lawn or garden. Select pavers that complement the style of your patio and are slip-resistant for added safety.
Paver Art
If you want to take your patio to the next level, consider adding some paver art. This can range from a simple design to a complex mosaic, depending on your creativity and skill level. Paver art is a fun and unique way to personalize your patio and make it a conversation piece for your guests to enjoy.
Outdoor Aesthetics
Finally, don’t forget to maintain the overall aesthetics of your outdoor space. Regularly sweeping and cleaning your patio will keep it looking beautiful and prevent the growth of weeds and algae. Consider adding some potted plants or outdoor furniture to create a warm and inviting atmosphere. If you have a larger patio, you may want to install some edging to create a clear border between the patio and surrounding areas.
Maintenance
To ensure the longevity of your patio, it’s important to perform regular maintenance. This includes cleaning and re-sanding the pavers, sealing the joints, and inspecting the edge restraints. As with any outdoor project, it’s important to stay on top of maintenance to prevent costly repairs down the road.
With these finishing touches and maintenance tips, your paver patio will be a beautiful addition to your home for years to come.
Conclusion
In conclusion, creating a stunning patio with pavers is a fantastic way to elevate the beauty and functionality of your outdoor living area. By following the simple and straightforward steps outlined in this article, you can easily create your own custom-made patio that fits your unique style and personal preference.
Don’t forget to take into account the climate and weather patterns of your area when planning your patio design. Additionally, consider including a paver pathway that complements your patio and adds an extra touch of elegance to your outdoor space.
Maintaining the quality of your patio is essential for its longevity and beauty. Regularly cleaning and sealing your pavers will help keep them looking their best for years to come. Additionally, consider incorporating paver art to add a unique and personalized touch to your patio.
With these tips and tricks in mind, you’re well on your way to crafting the patio of your dreams with pavers. So why wait? Start planning and designing your own stunning paver patio today!
FAQ
How do I choose the right pavers for my patio?
When selecting pavers for your patio, consider factors such as durability, style, color, and texture. Look for pavers that complement the architecture of your home and the overall aesthetic you want to achieve in your outdoor space.
What is the best size and shape for a paver patio?
The size and shape of your patio will depend on the available space and your personal preferences. Rectangular and square shapes are common choices, but you can also create curved or irregularly shaped patios to add visual interest.
How do I prepare the ground before installing pavers?
Before laying the pavers, it’s important to assess the site, remove any vegetation, and ensure a stable base. Clear the area of grass, rocks, and debris, and then level the ground. You may need to excavate and add a layer of compacted gravel or sand as a base.
What are edge restraints and why are they important?
Edge restraints are barriers that help keep the pavers in place and prevent shifting or spreading over time. They can be made of various materials, such as concrete, plastic, or metal. Installing edge restraints ensures the stability and longevity of your patio.
What is the purpose of the paver base?
The paver base provides stability, helps with drainage, and prevents the pavers from sinking or shifting. It typically consists of a compacted layer of gravel, sand, or crushed stone. Properly preparing and installing the base is crucial for a level and durable patio.
How do I lay the pavers in a visually pleasing pattern?
There are various patterns you can choose from, such as running bond, herringbone, basket weave, or circular. Follow the manufacturer’s instructions and consider the size and shape of your pavers to create a pattern that enhances the overall design of your patio.
What do I do if I need to cut or fit the pavers?
If you need to accommodate the shape of your patio or any features within it, you may need to cut or fit the pavers. Measure carefully, use a wet saw or chisel to make precise cuts, and ensure a proper fit. It’s recommended to wear safety goggles and gloves when cutting pavers.
How do I maintain the appearance of my paver patio?
Regular maintenance includes sweeping or blowing off debris, removing weeds or moss, and cleaning with mild detergent and water as needed. Sealing the pavers can help protect against stains and enhance their color. Consider adding edging or a paver pathway for a polished look.
- Crafting a Dream Patio with Pavers - November 26, 2023
- DIY Patio Paver Construction - November 24, 2023
- Creating Stunning Patios with Pavers - November 21, 2023